If you are framing artwork or a photo that has a border, signature or edition number, there are a few things to keep in mind.
Fortunately, you can achieve your desired results with online custom framing, all from the comforts of home!
In the following video and article below, we'll walk you through a few options and techniques you can use to design a custom frame that perfectly suits your art.
Frame It Without a Mat
The borders around an art print can serve the same role as matting, creating white space around the image that draws your eye towards the center.

Red Umbra Art Print by Alexander Grahovsky
One option for framing artwork with a border like this is to simply frame the print without any matting.
The inside edges of the frame will overlap the paper by 1/4", but there should be plenty of border remaining, and of course, the full image or photo is visible.
You will just need to measure the full dimensions of the paper from edge to edge. If you are unsure about how to do this, we go through it step by step in our guide to measuring artwork like a pro.
Cover the Borders With a Mat
One way to preserve that border but enhance its effect is to add matting to your frame.
This gives you some flexibility on the mat color, and the beveled edges of the matting provide added depth and sophistication. Our matting is archival and acid-free, on par with the other conservation-grade materials we use in framing online.
In addition to the edge-to-edge dimensions of the paper, we'll need to measure the image size to go this route, which is just the printed image of your artwork.

To cover the border completely, we will need to make the mat window almost the same size as the artwork, but it should be just a little smaller.
If our artwork is 6 x 6", the mat window should be 5-7/8" x 5-7/8". This ensures that the mat will slightly overlap the image without any gaps that would show the white of the paper.

If your artwork is in between sizes, it's better to round down to the nearest 1/8" to prevent any space showing between the art and the mat.
Add a Mat and Preserve Part of the Border
Another common practice is using a mat inside the frame while still revealing some of the paper border.
This can be especially useful when your artwork has uneven borders you'd like to correct or if there is information in the margins you want to show.
It can also just create a nice double matting effect and extra visual elements around the artwork.

To add a border like this for aesthetic reasons, you simply need the image size and the amount of paper you'd like to show between the image and the inside edge of the matting.

If the artwork is 6" x 6" and we want to reveal a small border around it, we will need to add that desired border width around each side of the image.
In this example, we take the image width of 6" and add 1/4" to the right and left sides, and then do the same vertically, adding 1/4" to the top and bottom. The most important thing is to make sure you don't forget to add the border twice.
So, for a desired paper border of 1/4" on each side of the image, we add 1/2" to the width and the height dimensions, giving us our mat window opening of 6-1/2" x 6-1/2".
Custom Mat Window Openings
Since the matting in our DIY custom frame kits will overlap the artwork dimensions you provide by 1/4" on each side, you will just add 1/2" to the width and height dimensions when inputting your dimensions to create a specific mat window opening.
Continuing with the example above of needing a 6-1/2" x 6-1/2" opening, we would input 7" x 7" to achieve the necessary window size when entering the artwork dimensions on our site.

And when building your custom frame on the next step using our frame visualizer, we show you exactly what the mat window opening will be, so it's a good idea to double-check this if you need a custom window size.

Seeing the specs in real-time as you customize your frame is just one of the many reasons to go with online custom framing for your next project.
Note that if you are covering up, for example, 2" of the paper's border, you should add at least 2" of matting to the frame.
Otherwise, even though your mat window will reveal the artwork properly, the paper will not fit inside the frame and will need to be trimmed.
Framing Art with a Signature
When framing art with a signature or edition number in the border, we can use the same methods above to ensure that nothing is cut off or covered up.

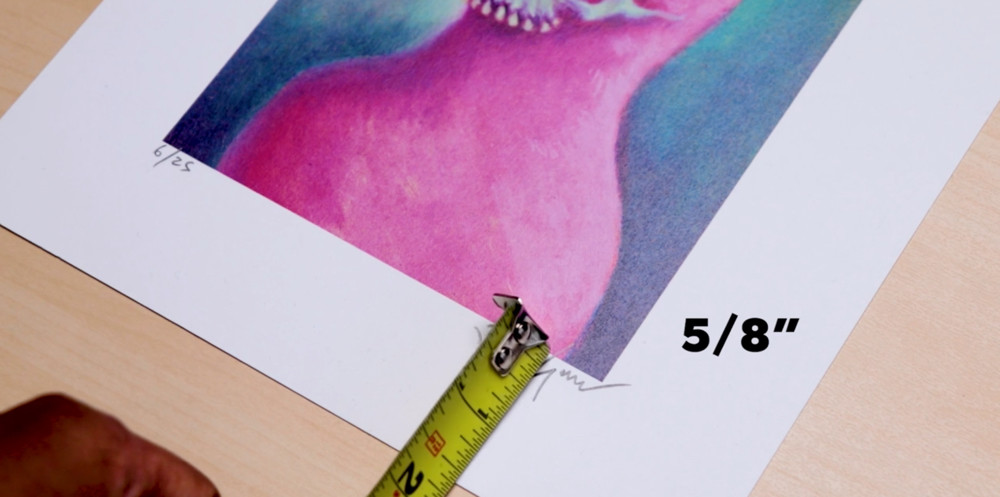
Bubblegum - Limited edition of 25 signed and numbered prints by Jeremy Cross
If you are adding a mat, you will ultimately decide the border size and the resulting mat window opening based on how much space the signature needs.
Here, we'll first measure how much space we want to show below the image to accommodate that signature or edition number.
It appears that 5/8" of paper showing beneath the image and the inside edge of our mat will properly reveal and show off that signature and edition number.
For the mat window opening on this print, we now have two options:
1) Create an even border of 5/8" around each side of the image, or
2) Go with a narrower border - say 1/4", around the left, right and top of the image - and then the 5/8" of space below the image we need to accommodate that signature or edition number.

An even 5/8" paper border showing (left), and a bottom-weighted border (right).
In either case, to get your ideal mat window opening, you will add the desired left and right borders to each side of the image width and the desired top and bottom borders to each side of the image height.
And again, once you have your desired mat window opening add 1/2" to the width and height when entering your artwork dimensions on our site, double-checking that window opening in the frame visualizer to see exactly what you are getting.
If you have any questions about the best way to custom frame your artwork or need help creating a custom mat window opening, we are standing by to help!
Our goal is the same on every online custom framing project: helping you reach the final result that will look amazing on your wall for years to come.
Every frame we make is special, because whether it's artwork, photos, collectibles, mementos or anything else, everything you frame is special.
Happy framing!


